Deadlifting is one of the best things you can do for your back. Subjecting your back to a controlled stress that forces it to adapt and become stronger is good for your longevity and overall quality of life. I am frequently amazed by how quickly non-specific back pain improves in clients after just a few weeks of barbell training – and deadlifting is central to this improvement.
In the Starting Strength model of barbell training, we have a simple 5 step setup procedure that puts everyone in the correct starting position to execute a mechanically efficient deadlift. To review in brief, the 5 step setup is:
- Walk up to the bar and place your mid-foot under the bar. This is the middle of your entire foot, not the middle of the portion of the foot in front of your shins. This means if you are standing up straight, your shins will only be about an inch away from the bar. Stance should be narrow, about 8-12 inches apart, with toes pointing out a little.
- Bend over at the hips. It’s okay to unlock your knees a little, but only a little. Grab the bar a few inches outside your shins. Don’t move the bar.
- Bend your knees until your shins just barely touch the bar, but don’t move the bar. Don’t drop your hips when you bend over to grab the bar. Push your knees out into your elbows.
- Squeeze your chest up to set your back in hard extension. Don’t drop your hips when you do this, and don’t move the bar. When you think you’ve squeezed up as hard as you can… squeeze up a little more. Embrace the discomfort.
- Take a big breath, hold it, and drag the bar up your legs, keeping it on your legs the entire time.
To be sure, the setup procedure is not everything to know about executing a correct deadlift. The pattern of knee and hip extension is important, as is keeping the bar on your legs, locking out solidly at the top, etc. But, diligently following the above setup procedure goes a long way toward solving many problems with the deadlift.
Steps 2 and 3 are separate steps!
One common mistake made by novice lifters, even some who are generally attentive to detail, is to combine steps 2 and 3. Instead of bending over at the hips and grabbing the bar (step 2), and then as a separate step bending their knees to establish the correct shin angle (step 3), lifters may both bend over and bend their knees simultaneously.
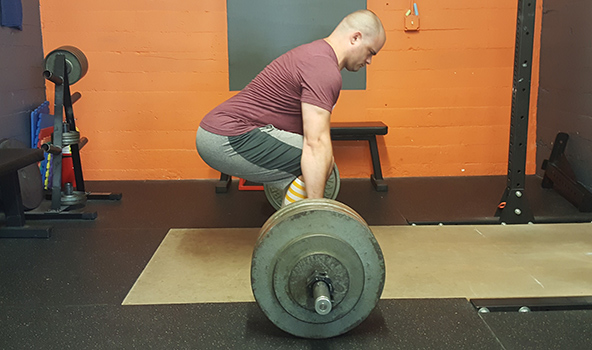
Almost always, this will result in an incorrect start position, with hips too low, the bar forward of the mid-foot, and the scapulae behind the bar rather than directly over it. The resulting position will typically look something like this:

An incorrect setup for the deadlift, with hips too low and bar in front of mid-foot.
Hips too low will result in a shin angle that pushes the bar forward of the mid-foot, rather than leave the bar directly over the mid-foot. The scapulae are behind the bar rather than directly over it, where they need to be. And when the pull actually starts, the hips will likely drift up prior to the bar breaking off the floor. There are good odds the bar will come off the legs in this scenario, and the lifter will have to overcome leverage that need not be there in order to finish the pull. In short: this is a mechanically inefficient start position, and while lots of people make this mistake and still succeed in getting strong, you can and should do better.
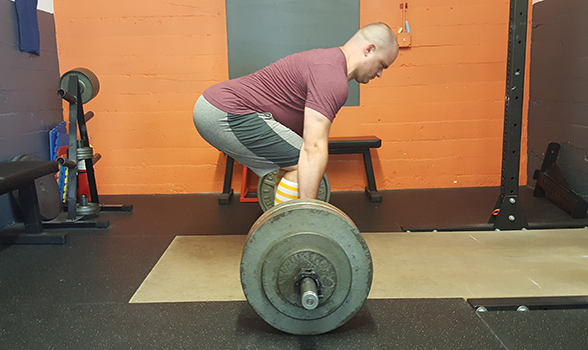
By contrast, if you execute steps 2 and 3 of the setup as separate steps, you will end up in a position that looks more like this:

A correct deadlift setup.
In this photo, hips are in the correct position for the lifter’s anthropometry, resulting in a shin angle that puts the shins in contact with the bar but doesn’t push the bar forward of the mid-foot. Scapulae are where they should be, directly over the bar.
The above photos are for illustration purposes only of the change in start position caused by blurring steps 2 and 3 together. Your precise back angle in your correct start position will be determined by your individual anthropometry.
Pay careful attention to your setup in your deadlift, and you will be rewarded with more efficient pulls and more consistent and sustained progress in your training.
